Embed Size (px)
DESCRIPTION
.
Citation preview

JMP-1H and JMP-1CLimited Edition, 50th Anniversary, all-valve 1-Watt Head and Combo
commemorating the 1970s decade of Marshall
OWNER’S MANUAL
1
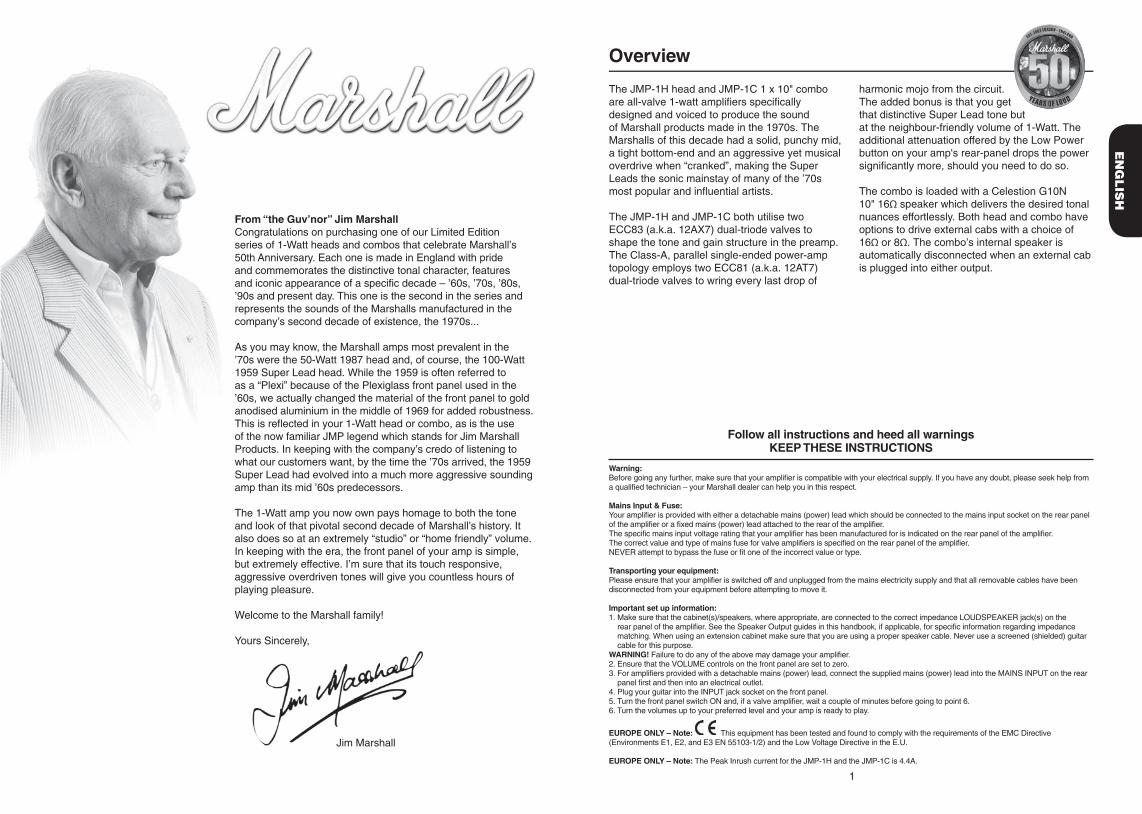
The JMP-1H head and JMP-1C 1 x 10" combo are all-valve 1-watt amplifi ers specifi cally designed and voiced to produce the sound of Marshall products made in the 1970s. The Marshalls of this decade had a solid, punchy mid, a tight bottom-end and an aggressive yet musical overdrive when “cranked”, making the Super Leads the sonic mainstay of many of the ’70s most popular and infl uential artists.
The JMP-1H and JMP-1C both utilise two ECC83 (a.k.a. 12AX7) dual-triode valves to shape the tone and gain structure in the preamp. The Class-A, parallel single-ended power-amp topology employs two ECC81 (a.k.a. 12AT7) dual-triode valves to wring every last drop of
harmonic mojo from the circuit. The added bonus is that you get that distinctive Super Lead tone but at the neighbour-friendly volume of 1-Watt. The additional attenuation offered by the Low Power button on your amp's rear-panel drops the power signifi cantly more, should you need to do so.
The combo is loaded with a Celestion G10N 10" 16Ω speaker which delivers the desired tonal nuances effortlessly. Both head and combo have options to drive external cabs with a choice of 16Ω or 8Ω. The combo’s internal speaker is automatically disconnected when an external cab is plugged into either output.
Overview
EN
GLIS
H
Follow all instructions and heed all warningsKEEP THESE INSTRUCTIONS
Warning:Before going any further, make sure that your amplifi er is compatible with your electrical supply. If you have any doubt, please seek help from a qualifi ed technician – your Marshall dealer can help you in this respect.
Mains Input & Fuse:Your amplifi er is provided with either a detachable mains (power) lead which should be connected to the mains input socket on the rear panel of the amplifi er or a fi xed mains (power) lead attached to the rear of the amplifi er. The specifi c mains input voltage rating that your amplifi er has been manufactured for is indicated on the rear panel of the amplifi er.The correct value and type of mains fuse for valve amplifi ers is specifi ed on the rear panel of the amplifi er. NEVER attempt to bypass the fuse or fi t one of the incorrect value or type.
Transporting your equipment:Please ensure that your amplifi er is switched off and unplugged from the mains electricity supply and that all removable cables have been disconnected from your equipment before attempting to move it.
Important set up information:1. Make sure that the cabinet(s)/speakers, where appropriate, are connected to the correct impedance LOUDSPEAKER jack(s) on the
rear panel of the amplifi er. See the Speaker Output guides in this handbook, if applicable, for specifi c information regarding impedance matching. When using an extension cabinet make sure that you are using a proper speaker cable. Never use a screened (shielded) guitar cable for this purpose.
WARNING! Failure to do any of the above may damage your amplifi er.2. Ensure that the VOLUME controls on the front panel are set to zero.3. For amplifi ers provided with a detachable mains (power) lead, connect the supplied mains (power) lead into the MAINS INPUT on the rear
panel fi rst and then into an electrical outlet.4. Plug your guitar into the INPUT jack socket on the front panel.5. Turn the front panel switch ON and, if a valve amplifi er, wait a couple of minutes before going to point 6.6. Turn the volumes up to your preferred level and your amp is ready to play.
EUROPE ONLY – Note: This equipment has been tested and found to comply with the requirements of the EMC Directive (Environments E1, E2, and E3 EN 55103-1/2) and the Low Voltage Directive in the E.U.
EUROPE ONLY – Note: The Peak Inrush current for the JMP-1H and the JMP-1C is 4.4A.
From “the Guv’nor” Jim MarshallCongratulations on purchasing one of our Limited Edition series of 1-Watt heads and combos that celebrate Marshall’s 50th Anniversary. Each one is made in England with pride and commemorates the distinctive tonal character, features and iconic appearance of a specifi c decade – ’60s, ’70s, ’80s, ’90s and present day. This one is the second in the series and represents the sounds of the Marshalls manufactured in the company’s second decade of existence, the 1970s...
As you may know, the Marshall amps most prevalent in the ’70s were the 50-Watt 1987 head and, of course, the 100-Watt 1959 Super Lead head. While the 1959 is often referred to as a “Plexi” because of the Plexiglass front panel used in the ’60s, we actually changed the material of the front panel to gold anodised aluminium in the middle of 1969 for added robustness. This is refl ected in your 1-Watt head or combo, as is the use of the now familiar JMP legend which stands for Jim Marshall Products. In keeping with the company’s credo of listening to what our customers want, by the time the ’70s arrived, the 1959 Super Lead had evolved into a much more aggressive sounding amp than its mid ’60s predecessors.
The 1-Watt amp you now own pays homage to both the tone and look of that pivotal second decade of Marshall’s history. It also does so at an extremely “studio” or “home friendly” volume. In keeping with the era, the front panel of your amp is simple, but extremely effective. I’m sure that its touch responsive, aggressive overdriven tones will give you countless hours of playing pleasure.
Welcome to the Marshall family!
Yours Sincerely,
Jim Marshall
2 3
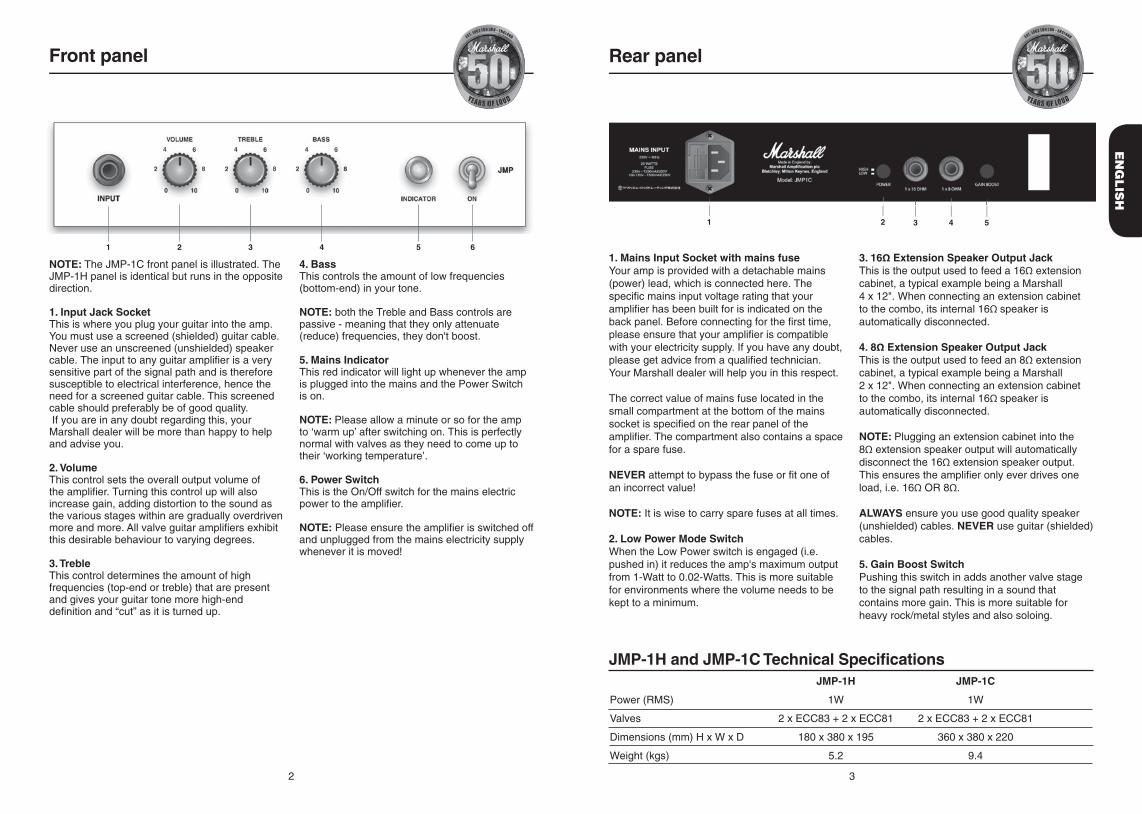
Front panel
NOTE: The JMP-1C front panel is illustrated. The JMP-1H panel is identical but runs in the opposite direction.
1. Input Jack Socket This is where you plug your guitar into the amp. You must use a screened (shielded) guitar cable. Never use an unscreened (unshielded) speaker cable. The input to any guitar amplifi er is a very sensitive part of the signal path and is therefore susceptible to electrical interference, hence the need for a screened guitar cable. This screened cable should preferably be of good quality. If you are in any doubt regarding this, your Marshall dealer will be more than happy to help and advise you.
2. VolumeThis control sets the overall output volume of the amplifi er. Turning this control up will also increase gain, adding distortion to the sound as the various stages within are gradually overdriven more and more. All valve guitar amplifi ers exhibit this desirable behaviour to varying degrees.
3. TrebleThis control determines the amount of high frequencies (top-end or treble) that are present and gives your guitar tone more high-end defi nition and “cut” as it is turned up.
4. BassThis controls the amount of low frequencies (bottom-end) in your tone.
NOTE: both the Treble and Bass controls are passive - meaning that they only attenuate (reduce) frequencies, they don't boost.
5. Mains IndicatorThis red indicator will light up whenever the amp is plugged into the mains and the Power Switch is on.
NOTE: Please allow a minute or so for the amp to ‘warm up’ after switching on. This is perfectly normal with valves as they need to come up to their ‘working temperature’.
6. Power SwitchThis is the On/Off switch for the mains electric power to the amplifi er.
NOTE: Please ensure the amplifi er is switched off and unplugged from the mains electricity supply whenever it is moved!
Rear panel
1. Mains Input Socket with mains fuseYour amp is provided with a detachable mains (power) lead, which is connected here. The specifi c mains input voltage rating that your amplifi er has been built for is indicated on the back panel. Before connecting for the fi rst time, please ensure that your amplifi er is compatible with your electricity supply. If you have any doubt, please get advice from a qualifi ed technician. Your Marshall dealer will help you in this respect.
The correct value of mains fuse located in the small compartment at the bottom of the mains socket is specifi ed on the rear panel of the amplifi er. The compartment also contains a space for a spare fuse.
NEVER attempt to bypass the fuse or fi t one of an incorrect value!
NOTE: It is wise to carry spare fuses at all times.
2. Low Power Mode SwitchWhen the Low Power switch is engaged (i.e. pushed in) it reduces the amp's maximum output from 1-Watt to 0.02-Watts. This is more suitable for environments where the volume needs to be kept to a minimum.
3. 16Ω Extension Speaker Output JackThis is the output used to feed a 16Ω extension cabinet, a typical example being a Marshall4 x 12". When connecting an extension cabinet to the combo, its internal 16Ω speaker is automatically disconnected.
4. 8Ω Extension Speaker Output JackThis is the output used to feed an 8Ω extension cabinet, a typical example being a Marshall2 x 12". When connecting an extension cabinet to the combo, its internal 16Ω speaker is automatically disconnected.
NOTE: Plugging an extension cabinet into the 8Ω extension speaker output will automatically disconnect the 16Ω extension speaker output. This ensures the amplifi er only ever drives one load, i.e. 16Ω OR 8Ω.
ALWAYS ensure you use good quality speaker (unshielded) cables. NEVER use guitar (shielded) cables.
5. Gain Boost SwitchPushing this switch in adds another valve stage to the signal path resulting in a sound that contains more gain. This is more suitable for heavy rock/metal styles and also soloing.
EN
GLIS
H
1 2 3 4 5 6
1 2 3 4 5
JMP-1H and JMP-1C Technical Specifi cations JMP-1H JMP-1C
Power (RMS) 1W 1W
Valves 2 x ECC83 + 2 x ECC81 2 x ECC83 + 2 x ECC81
Dimensions (mm) H x W x D 180 x 380 x 195 360 x 380 x 220
Weight (kgs) 5.2 9.4
20 21
Notes Notes

Denbigh Road, Bletchley, Milton Keynes MK1 1DQ EnglandTel : +44 (0)1908 375411 Fax : +44 (0)1908 376118
www.marshallamps.com
Whilst the information contained herein is correct at the time of publication, due to our policy of constant improvement and development, Marshall Amplification plc reserve the right to alter specifications without prior notice.
BOOK-00105-00 / 11 / 11


![Handbook esp[1]](https://img.pdfslide.es/doc/110x75/559a7e691a28aba2648b479e/handbook-esp1.jpg)